|
Part 3 of the Operation Codenamed "no-i-dont-need-a-journal-but-i-make-one-anyway" I've finally sat down and get the hands dirty... Decided on a theme while looking at the materials I have on hand. I always believe in using readily available materials. So, for this first page, i've used things found in the house, where I happen to have many vintage-related elements. It's a vintage theme alright! Paper: Japanese Marbled Cardstock, White Acid-free paper, Paper Doily, Corrugated Paper, Translucent Paper Inks: Tim Holtz Distressed Ink "Old Paper", Artnic "Apple Green" Faber Castell "Yellow", Versa "Bark" Stamp: Kaiser Script Cutting Tools: Scalloped Scissors, Regular Scissors Adhesives: Double-sided tape, Mounting tape Use your favourite vintage clipart to spruce the page!  Simply stamp around the white cardstock with Kaiser Script stamp in the inks to create a distressed aged look (See below) The pressure you used while applying the ink to the stamp determines how faded the stamped effects will turn out, so vary the pressure in applying. And I cant emphasise how important that we must remember to distress the edges of the cardstock! 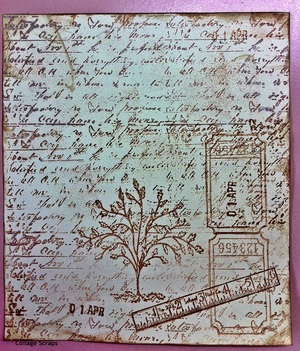 Preparing the elements: 1) Scallop the stamped cardstock with the scalloped scissors and cutting the translucent paper and the corrugated paper into strips as side border. 2) Tag and postcard are made with white cardstock in distressed inks. Images on tags and postcard are drawn on, 3) Use double-sided tape to secure them and mounting tape for the "pop-up" effect as seen with the vintage clipart. 4) Distressed look for the paper doily too. Finally, add in words or quotes on the spaces. Arranging the elements and TADAH, the completed first page  Kaiser Script and Versa "Bark" - the right concoction to create the overall aged paper look. (:
Stay tuned for the second art journal page!
0 Comments
Your comment will be posted after it is approved.
Leave a Reply. |
